A reverse osmosis system is a great way to get clean, fresh water for your home or office. But like any other piece of machinery, it can sometimes malfunction.
Our troubleshooting guide will help you identify and fix the problem quickly and easily. We provide step-by-step instructions along with photos and videos to make the process even easier.
You deserve to have a water filtration system that works perfectly every time – without any headaches. That’s why we created this troubleshooting guide – so you can get back to enjoying clean, delicious water worry-free.
In this guide, we will discuss 10 common problems that can occur with a reverse osmosis system, and how to fix them.
Read my comprehensive article about reverse osmosis.
Table of Contents
Reverse Osmosis Troubleshooting – 11 Common Problems
Your reverse osmosis system is a vital part of your home or office, and it’s important to keep it in good working order.
| Key Takeaways: |
| Troubleshooting a malfunctioning reverse osmosis system can help identify and fix common problems. |
| There are 10 common problems with reverse osmosis systems, including no water, slow water flow, bad taste or odor, leaking membrane housing, gurgling noises, leaking filters, leaking faucet, cloudy or milky colored water, system running continually, and bad water taste or smell. |
| Solutions for these problems include checking valves, filters, and hoses; adjusting operating pressure; replacing membranes, filters, and faucets; and purging air from the system. |
| – Checking valves, filters, and hoses |
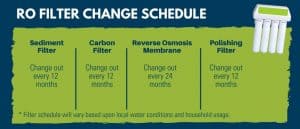
| Regular maintenance, such as replacing filters, can help prevent these problems from occurring. |
| A comprehensive troubleshooting guide can help fix these issues and get your reverse osmosis system running smoothly again. |
Troubleshooting reverse osmosis systems can be challenging, but with a little know-how, you can easily identify and fix many common problems. Here are the most common problems that people experience with their RO systems, and how to fix them:
Problem #1 – No Water or Low Water Pressure
If your RO faucet is not producing water, not even a trickle, check for the obvious problem – a closed valve. You’d be surprised how often this is the issue. Check the primary valve (also known as the main feed valve) to be sure it’s open. You should also check the tank valve – not every RO system has a storage tank, but if yours does, it almost certainly has a shutoff valve.
Filters can become clogged for a variety of reasons, one of which is the accumulation of debris. If water isn’t flowing through the faucet, check to ensure that all the filters are clean and positioned properly. Replace your filters if they’re clogged.
Check all of your hoses to see if any are kinked. If so, straighten them out and make sure water can flow freely through your filter.
If everything looks to be fine with your RO filter, check whether or not there’s enough pressure at the main line coming into your home. Sometimes, the problem is with the water supply and not your RO unit.
Problem #2 – Water Flows Slowly Through Faucet
Most reverse osmosis filters produce water at a rate that is much lower than water coming out of your sink faucet. An under-sink RO filter might only produce 1/2 gallon per minute (gpm) of treated water. Before checking for a problem, make sure that your system is really producing less water than it should.
To check the flow rate of your RO filter, fill up a gallon jug and time how long it takes. To calculate your RO system’s flow rate in gpm, use this equation:
Flow Rate (gpm) = 1 / [time to fill 1 -gallon jug in minutes]
Low flow from your RO filter can be caused by a few things.
- You may have low water pressure coming into your home.
- If you have a well, there is a problem with the pressure tank.
Low pressure will result in less water being forced through the filter membrane. You may need a booster pump for your RO filter.
Problem #3 – Bad Taste or Odor

If your RO filter is producing water that tastes or smells bad, there could be a problem with the filter itself. The first thing you should do is check all of your filters and make sure they’re clean and positioned properly. If your carbon filter has been in service for more than a few months, it’s time for a new one.
Check your particle filter too. Sometimes, they get bacteria in them which can affect the taste and smell of your water.
If that doesn’t fix the problem, flush your system according to the manufacturer’s instructions. Read my article on how to clean and sanitize your RO filter.
Another possible cause of poor water quality is a bad RO membrane. Most membranes last several years, but they eventually go bad. Check the performance of your reverse osmosis filter to confirm that it’s working properly.
Problem #4 – Leaking Membrane Housing
Leaks are a common problem with RO filters. Inspecting your system for leaks will help you identify areas where water may be leaking. You can find the leakage points quickly and easily by looking at connections, faucets or pipes that are connected to it.
The two most common causes of membrane housing leaks are:
- The threaded cap on the end of the housing is leaking. Apply Teflon tape or silicone sealant to the threads and retighten.
- The cap or housing body is cracked and leaking. Check for any cracks in the membrane housing and/or housing cover, as they may be cracked or damaged. Replace the membrane cartridge if it’s broken.
Sometimes this problem is caused by hard water scaling. If you have hard water, you may need to install a water softener to protect your RO system.
Problem #5 – Gurgling Noises from Drain or Faucet
If you hear gurgling noise coming from your drain, it could be because there’s too much water going down the sink. Every RO filter wastes water as part of the filtration process. If your unit is not functioning properly, it may be rejecting too much water.
Start by measuring the amount of water going down the drain from your RO unit. Fill a measuring cup and time how long it takes to fill up. Compare the flow rate to the Owner’s Service Manual. You may need to adjust the operating pressure or replace the membrane to fix this problem.
Air in the line is another cause of noise. Give it a day or two to see if the air gets purged from your line. If the noise continues, disconnect the tubes and flush them with water to remove the air. Reassemble everything and check to see if this solves the problem.
Problem #6 – Leaking Filters

A leaking carbon or sediment filter is a common problem. If your filter is loose, try tightening the housing unit. If that doesn’t work, you’ll need to replace the filter.
Sometimes you can put Silicone sealant on the tube connectors and eliminate the leaks. Don’t use too much, or you’ll make the leak worse.
Problem #7 – Leaking Faucet
A leaking dispenser faucet is another common issue with RO filters. There are three common causes of this problem.
- Leaking fittings. Tighten the fitting – verify that the tubing is fully inserted into the faucet stem /base of faucet stem.
- Leaking brass stem. If the stem is leaking, you need to replace the faucet. This isn’t something you can repair.
- Drips from the spigot. May need a faucet repair kit installation.
Problem #8 – Cloudy or Milky Colored Water

If you notice that the water coming out of your reverse osmosis system is cloudy or has a milky color, it’s probably due to one of three things.
The first possibility is your RO membrane is not working. Measure the TDS of your treated water. If it’s high (greater than 30 ppm), you probably have a bad membrane and will have to replace it.
Another cause is high levels of oxygen in your water supply. This is actually just tiny bubbles of oxygen that sometimes get into the public water supply. Eventually, they will go away, and so will your cloudy water.
The third cause of cloudy water may be from new filters. When you replace the filter or membrane on your RO system, of if it’s new, there will be air in the cartridges and the connecting lines. This air usually goes away on its own. If it doesn’t, you’ll have to disconnect the lines and purge the air out of your system.
Problem #9 – System Runs Continually
If your RO system has a tank, then it likely has an automatic shutoff valve. This valve is set to close when the tank pressure reaches 66% of the supply pressure. Sometimes, this valve gets stuck or malfunctions. You may be able to unstick the valve by removing it and putting it back into position. It may require disassembly to get it to work properly.
If this doesn’t solve the issue, you may need a new automatic shutoff valve.
Problem #10 – Water Tastes and Smells Bad
If your water tastes or smells bad, it’s probably due to the filters. The first thing you should do is replace the sediment filter and carbon filter. If that doesn’t work, you may have to replace the membrane cartridge as well.
Problem #11 – Water Storage Tank Leaks
Water storage tank leaks are a common issue with reverse osmosis systems. Leaks can be caused by a damaged bladder or diaphragm, malfunctioning valve, or cracked tank. Signs of a leak include pooling water and hissing or gurgling sounds. Prompt action is necessary to prevent further damage. Depending on the severity of the leak, replacing the tank or bladder, repairing the valve or fitting, or seeking professional assistance may be necessary. Regular maintenance and inspection of the storage tank can help prevent this problem.
Problem #12 – Clogged Air Gap
One important component to check is the air gap, which helps prevent backflow of water into the system. If the air gap is clogged or not functioning properly, it can cause low water pressure or even contaminate the water supply.
Problem #12 – Drain Saddle Clogged
The drain saddle is an important component that can become clogged and lead to drainage issues. Regularly inspecting and cleaning these parts can help prevent problems down the line.
Preventative Maintenance versus RO Troubleshooting
Preventative maintenance involves regularly inspecting and maintaining a system to prevent issues from occurring. Troubleshooting, on the other hand, involves identifying and fixing issues that have already occurred in a system. Focusing on maintenance can eliminate a lot of the problems with your RO system and save you a lot of time and money.
Another important aspect of RO troubleshooting is checking the valves and filters. The check valve is responsible for preventing backflow of water from the storage tank, while the tank valve regulates the flow of water in and out of the tank. If these valves are not working properly, it can lead to issues with water pressure and flow.
Additionally, regularly replacing water filters can help maintain the quality of the water system and prevent clogs that could lead to damage in the plumbing. Finally, consider adding a UV filter to your RO system to help remove bacteria and other contaminants from the water supply.
Overall, troubleshooting your reverse osmosis system requires a basic understanding of its components and regular maintenance to ensure it is functioning properly. By checking the air gap, drain saddle, valves, filters, and adding a UV filter, you can help prevent many common issues and keep your water system running smoothly.
Final Take on Troubleshooting Reverse Osmosis
If you are experiencing any of the above problems with your reverse osmosis system, don’t worry. We put together this comprehensive guide to help you troubleshoot these issues. The first step is identifying the problem, and then following the corresponding steps to fixing it. Use our reverse osmosis troubleshooting guide for some much-needed relief and get your RO system up and running smoothly again in no time!

